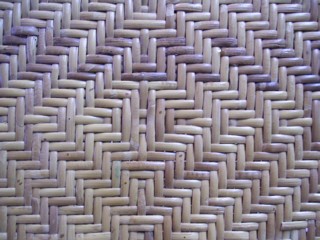
 shown in 1/2 flat reed
 HERRINGBONE shown in 1/2 flat reed
To begin, know that the smooth side of the reed is the right side-- you want it to be showing on the outside of the footstool -AND you work with it wet. So pull 3 of the longest strands and set them in your tub of water for about 5 min.
You will first do the warping from back to front. Take one wet strand and clamp it to the top of the left rail near the back support.
Bring the long end over the front rail, under and up over the back rail, as close to the inside of the left back support as possible.
Continue warping until the back rail is evenly filled.
Clamp off with the last possible warp on the underside & cut as close as possible at the back right support.
Weave these two clamped ends into set pattern after about 6 rows of weaving.
*When you need to start another strand always do it on the underside, overlapping about 4 and stapling together once or twice. Pinch staples with pliers to prevent cut fingers.
_______________________________________________________________
The herringbone pattern is over 3 warp strands, under 3 warp strands, each row moving one warp to the right. This pattern is done on both the top and underside.
YOU WILL ONLY HAVE (3 OVER, 3 UNDER) where it is possible. Beginnings and endings of the rows are always 3 or less. So start with a new WET strand at the left back rail.
Weave only 1 over, then under 3, over 3 to the end and then draw enough through to weave one row on the underside.
Flip the rocker, work the short end first as first row on top was woven.
Then from the other direction weave the second row with the long piece of the strand,
BUT here you want to begin moving your pattern one to the right, as you will next with the 2nd row on the top side; 2 over then 3 over 3 under 3 over.
Row 3 begins 3 over 3 under 3 over. Row 4 begins 1 under 3 over 3 under. Pattern should now be set on top & bottom.
Push-slide rows together with the side of your dull knife or packing tool as you weave.
Overlap ends on the underside, again about 4, to start a new strand,but no need to staple. AND staples used in the warping can be removed if they show, when you have your rocker completed.
Several filler warps will be needed on the front rail. Weave them in, in pattern, when the weaving is about half done. Each is done with a single piece of reed.
Top first as far as you can take it, ending under. Then same piece over the front rail to the underside back as far as you can take it, also ending under & clipping.
Stain-seal or paint the flat reed when it is dry. Binder cane should not be sealed or painted.
Variations of this basic caning pattern available are Diamond, Diamond, Multi Diamond.
Helen B. Cribbs