|
||||||||||||||||||||||||||||||||||||||||||||||||||||||||||||||||||||||||||||||
 |
||||||||||||||||||||||||||||||||||||||||||||||||||||||||||||||||||||||||||||||
|
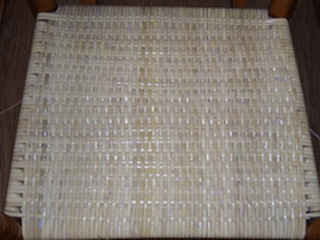
BASKET WEAVE PATTERN caned chair seat |
||||||||||||||||||||||||||||||||||||||||||||||||||||||||||||||||||||||||||||||
| Printable View | Back to Patterns | |||||||||||||||||||||||||||||||||||||||||||||||||||||||||||||||||||||||||||||
| Basket Weave Pattern
warping: Left to right Working with WET strands, begin by laying the first strand completely on the seat horizontally from right to left at the back rail and pull under the bottom to the right rail. Clamp at the left rail where the strand goes under the seat. This is awkward at first getting started, but keep moving. It will come together. At this point the long end of your strand is on the right side. Bring it under the bottom, over the top again to the right rail. You now have two crossings on the bottom and the top. Continue by wrapping twice around the right rail, then go to the left rail, and wrap twice. (This gives you the necessary spacing to easily weave later, front to back, etc.) Now wrap all the way to the right rail, under the bottom, over the top again, under the bottom and you are now at the left rail. Wrap just the left rail twice, then over and wrap just the right rail twice. Continue to repeat this paragraph until you have filled to the front rail, ending on the underside. Clamp end.Weave into pattern when possible. __________________________________________________________________ Attach new warp strands by overlapping about 3” and stapling -----always on the underside. Attach new weaving strands by generously just overlapping in pattern,-----on the underside. I like to put a 1” piece of foam, cut to size, in between the warping at this point. _________________________________________________________________ Weaving: front to back I begin near the left front rail, drawing a new strand (under two “mated” warps, over two) then repeat straight to the inside of the left seat post at the back rail and continue this same pattern weaving the under side and ending at the front rail. With your long end of strand on the top side(headed to the underside) repeat this row until you are on top and at the front rail again. Now reverse your draws, beginning on the underside, for two complete rounds (over, under), then reverse back to the first pair of draws (under, over). Fillers, if needed, can be woven in to pattern as you are comfortable doing them. Note: When you get to the right underside, the pairing of “mated” strands will be more stretched out- mismatched in pairings. That’s okay. It’s just how the weaving falls into place. You can also alternate ( over-under draws) each row, rather than every two rows for a different effect. And depending on the material you are using to weave, you can do just This pattern can also be done in 1/2” flat reed, 1/4” fat oval reed, other binder sizes. Chairscaned.com, Helen B. Cribbs |
||||||||||||||||||||||||||||||||||||||||||||||||||||||||||||||||||||||||||||||
 |
||||||||||||||||||||||||||||||||||||||||||||||||||||||||||||||||||||||||||||||
|
© Copyright ChairsCaned.com all rights reserved 2007-2019 |
||||||||||||||||||||||||||||||||||||||||||||||||||||||||||||||||||||||||||||||
