| Chairscaned.com |  |
|||||||||
|
I guess it's an impatience with being half-assed. |
||||||||||
| SEVEN STEP STRAND CANE | ||||||||||
| The Basic 7 Step Chair Cane Weave
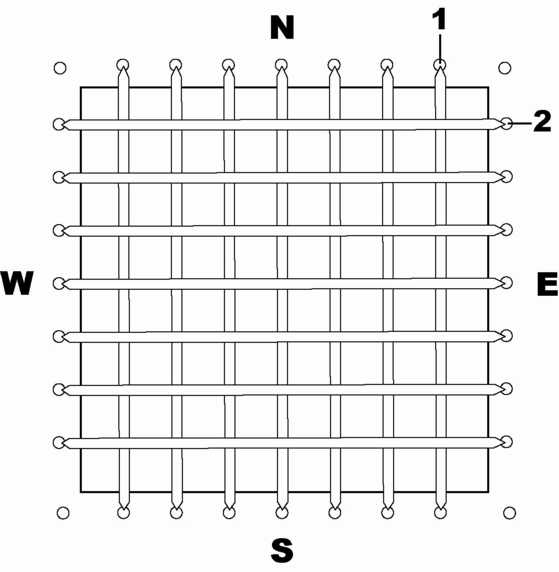
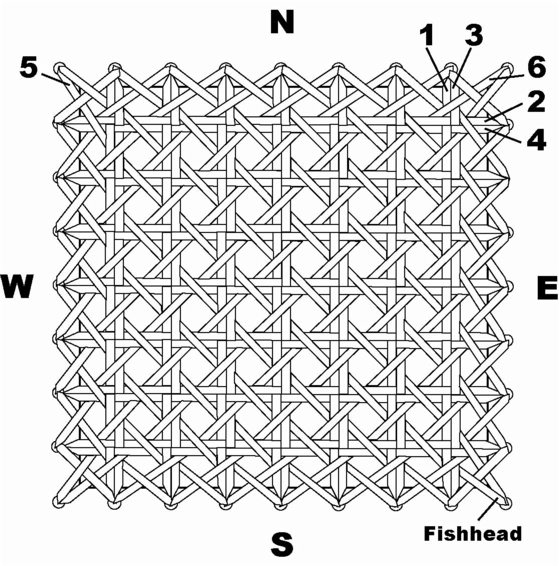
The 7 steps to weaving the basic, most common pattern of caning, are divided into 3 functions. A. Steps 1- 4 are meant to form the most square, even, eye appealing grid intersection to allow the next (B) diagonal weaving. On a square or rectangular seat the choices are obvious. But, as most seats are of an irregular shape and hand drilled, abit of planning must be done. Changes can be made as you weave these steps, but by the 4th step, you should be satisfied with the look before proceeding. B. Steps 5 & 6 are the diagonals woven from two different directions. They are woven slightly under each of the four corners in support of the(A) grid intersections. Each grid should be supported by diagonals, even those lying over the frame of the seat. C. Step 7 is the finishing strip. It is done by placing a thicker binder strip of cane over the outer caned holes and held in place by lashing nodes at each hole with strand cane. (Basic Rules)---The 7 Steps of Strand Chair Caning 1. Do not use the 4 corner holes in Steps 1- 4. Identify them,-- then ignore them until Steps 5 & 6. 2. Start each of Steps 1- 4 from its opposite side of the seat. This will provide a loop on the underside between each hole. The under loops are needed to knot strand cane endings. 3. During weaving, it is permitted to pass over (overlap) one hole on the underside. You do not want long pieces of cane covering many holes on the underside. Very messy! 4. You must see a fish head* in each of the outer 4 corner holes of the seat. On a square or rectangular seat there will be a fishhead in each of the 4 corners. On other shapes there will be more, even possibly on a rounded front rail. Consider them as tucks. * A fish head is where two diagonal strands from the same directon, during Steps 5 & 6 come together, ending in the same hole . 5. You are looking for the strand cane to make Xs appear around the outer edge. In Steps 5 and 6, if you are drawing each strand as straight as possible through each row of weave and supporting each grid intersection in that row, they will happen. This makes the very last draw of each row at the outer edge a most important decision. So keep asking yourself, before each last draw-- Will I see the X or do I need to form a fish head? It's one or the other most of the time. 6. Both left and right side edges should match as much a possible. Where you weave a fishhead on the left side(Step 5) try to balance one on the right side(Step 6). If you need to skip a hole try to do it the same on both side. GOOD SUPPORT and EYE APPEAL Material and tools needed. A chair seat or project that is in tip - top shape, --- sturdy,painted or refinished. Caning should be the final step to your project. Strand cane sized to fit the holes you are weaving. First measure the diameter of a hole. Then measure from the center of that hole to the center of the one next to it. These two dimensions will denote the strand cane size you need. Remember you will be going through each hole possibly 7 times. So if your measurements are between two sizes, choose the smaller. See (PEERLESS RATTAN.com) catalog for strand cane size choices. A strip of narrow binder cane (4-4.5mm.) for the finishing strip. If you are using medium strand or wider to weave, then choose medium binder cane (5-5.5mm.). Caning pegs (at least one pkg. of 12). Temporary tension holders. An awl. It's like an ice pick, pointed, to lift your cane during weaving. Also used in the holes caned, pressing the woven strands to the sides of the hole making room for more weaving. Narrow pointed scissors. Small pan of water to wet the cane. Spray bottle of water to keep the woven cane wet. Finally! Getting your project underway!! Relax. It's fun--and not complicated. Consider your project a map and you are seeing it like the weather man. The back of your chair is Canada or (N) north. The front rail is Texas or (S) south. The right rail is the Atlantic Ocean or (E) east and last the left rail is the Pacific Ocean is (W) west. If you are working with an open footstool you will have to denote one of the narrow sides as (N). Mark it and go from there. You do not want to get turned around during the weaving process. |
||||||||||
 |
||||||||||
Step 1. Have several of the longest strands of cane soaking in your pan of water while you find the center hole of the N rail and S rail. Mark each of these center holes with a peg. Remove one strand of cane from the water. Know that the smooth, shiny side is the protective skin side and it should always be showing upward toward you. Remove the S peg, draw the strand end up from the bottom, through the hole, up over the seat opening and down into the N peg hole, leaving about a 4" tab extended under the N hole. Re-peg this hole. Back at the S hole, pull the strand easily firm and re-peg. Next bring the long strand up through the hole next to it (E) side, on to the back rail, down next to the first worked hole and continue N to S to N etc. until the back rail is filled in( excluding the back NE corner hole). If you need a new strand of cane, you can end on either rail, just have at least a 4" tab to tie off later then peg the hole. And you should have move the S peg along from hole to hole, so at this point only two pegs have been used per strands used. Work toward the left of the center holes in the same manner. NOTE: Get into the habit of running your fingers along the entire strand you are working , each and every time before you make a draw. This will help keep the strand from twisting, know when to spritz wet, and you will be aware of a weak section of the strand that should be cut away. Any long ends on the underside can now be used to start Step 2. Peg center holes on E & W sides to I D a straight horizontal line. Lay strands over Step 1 from these points--- horizontally. If you are confident, go ahead and keep using any long ends from the underside as far as they will go, but remember not to overlap more than one hole on the underside. When beginning with a new strand, start it on the E side of the seat. Again, fillers at the front may be needed, -- horizontally this time. Look at your work. Eye the squares you now have. Add fillers horizontally down to the front rail as needed., keeping the same square size look. You will be skipping a few side holes to accomplish this. You may need one along the back rail also. |
||||||||||
 |
||||||||||
Step 3. This row repeats your Step 1 hole choices. Start on the N side ( considering your underside loops) and just draw a strand ( on top of Step 1 & 2 ) laying abit east of each Step 1 vertical row. Abit east makes it easier to weave Step 4. Strands kept wet?. Pulled straight, no sagging? Pegs where needed? Step 4. After weaving all of Step 4, look at your work. Adjust if needed. Finger the intersections together and into straight lines. The diagonal weaving will also help to straighten your work. Now,flip the chair and knot* all end tabs, removing as many pegs as possible. Clip all knotted ends to 4." Still need a loop somewhere? Plan for it when stopping and starting the next two steps. |
||||||||||
 |
||||||||||
DIAGONALS Step 5. over the closest pair of horizontal strands( right south of the corner hole) and under the next pair of vertical strands( look to the adjacent right). Keep moving down one then over one diagonally toward the SE corner. It’s usually easy to weave past two grid intersections before drawing the strand taunt. Each strand should be pulling smoothly and laying abit under the corner of the intersection . At the SE rail hole leave a 4" end tab-- to later knot-- but now peg. STEP 6. |
||||||||||
 |
||||||||||
STEP 7. If your project has the drilled row of holes meeting at the corners sharply like a right angle, then you should stop and start your binder finishing strips at these corners. If it's a round seat, pick a hole in the center back to start and end a binder finishing strip. Have your narrow or medium sized binder piece(s) plus lashing strands wet . Cut the binder pieces to size allowing an inch to be tucked in both the start and stop holes. Begin by tucking in one end of a binder piece ( skin side up) into a start hole. Hold flat while bringing an end of strand cane up through the hole next to it, come over the binder (skin side facing up) and back down into the same hole leaving a 4" tab. Pull tight. With long end of strand come up under the next hole(smoothly and tight), over the binder back down that same hole. Continue around the entire rail until all the holes are covered and bound neatly. You can end and begin a new piece of strand anytime, just have that 4" tab left on the underside to knot off later. The "nodes" you have now created over each holes should be laying tight and flat to the rail. Your weaving should have each hole filled for natural, lasting tension. Finally, turn your chair over and knot remaining tab ending, then clip, and tuck neatly into the nearest underside hole using your awl. Start-Stop holes on the top side can be opened abit with your awl and pegged for a finished look. Round reed (#5) pieces or small round dowel rods cut to 1" length work nicely. Let this project dry for a day before using. The cane will gradually darken on its own naturally. Congratulations on completing your project. Enjoy!!! |
||||||||||